Smart Contracts: a (mildly) practical example
This post is a short introduction to smart contracts: How they work, what you can do with them, and how to develop and interact with one.
1. Introduction
If you've ever used an object-oriented programming language, you know what an object is: An object contains internal state in the form of attributes and attribute values, and methods that can change that internal state. Objects are created from classes. A class is like a blueprint for an object: It defines attributes and methods, but does not have attribute values itself.
Well, a smart contract is like a class. And just like you can instantiate an object from a class, you can create an instance of a smart contract by deploying it to a network. The key thing about smart contracts is that their internal state is persisted on many computers across the network. If the network functions properly, that means that the state can never get lost, and can only change by calls to the methods you defined. Good smart contract networks are byzantine fault tolerant, which means that if a minority of computers on the network fail, or even intentionally try to break the rules, the network will still function.
Here’s the thing: you need a lot of computers running at the same time to keep such a network healthy. And the people who run those computers, well, they don’t do it for free. They do it because they get paid! And if you want to use smart contracts, well, you’re the one who has to pay for it. The money you pay for interacting with a smart contract is called the gas fee. Each instruction in the contract costs a certain amount of gas, and the price for one unit of gas depends on the current network load. The more people want to run contracts at the same time, the more expensive the gas becomes. Gas fees are paid in something called a native token, which is a cryptocurrency that is maintained by the network itself. In very simple terms, the network keeps track of how many tokens each user has, and when you interact with a contract, it takes some tokens out of your account and adds them to the accounts of the people who actually run the code.
Most networks have some sort of HTTP API with public endpoints that you can send smart contract transactions to. To authenticate yourself, you need to sign the request with a private key. Of course, in practice you don’t do that yourself. Typically you install an app or browser extension that stores your private keys for you. The most common browser extension is metamask. It injects a JavaScript object into websites you visit, and websites that use smart contracts can use that object to send transactions on your behalf (with your permission).
Ok that's enough theory, time for an example.
Do you like to play Tic-Tac-Toe?
In this example we'll create a smart contract that maintains a list of Tic-Tac-Toe games, and a web frontend that interacts with it. Here's a little demo of what it will look like: https://jfhr.de/tictactoe
You can also find the whole source code at https://github.com/jfhr/tictactoe.
2. Smart Contract Programming Languages
Some networks support using general-purpose programming languages, like Rust or JavaScript, to write smart contracts. But most often, they're written in special-purpose languages. The most popular one is Solidity. Solidity has a syntax similar to C++ and contracts are defined like to classes. Here's an absolutely minimal example:
pragma solidity ^0.8.13;
contract Counter {
    uint public value;
    function increment() public {
        value++;
    }
}
The first line defines the compiler version we want to use. That's
important because Solidity is under very active development and breaking changes are
common. contract Counter declares the smart contract itself. uint public value is a state
variable. In solidity, uint without a suffix is an alias for uint256.
function increment() public declares a method, the public keyword means that this method
can be called from the outside, either from another smart contract, or from an app that interacts with it.
The method body is self-explanatory: It increments the value state variable by one.
You can put this contract in a file named e.g. Counter.sol and compile it with the command:
npx solc Counter.sol --binThis will create bytecode for the contract in a file named Counter_sol_Counter.bin . The bytecode is
what you send to the network when you deploy the contract.
Additionally, you can create the ABI for this contract by running:
npx solc Counter.sol --abiThe ABI is a JSON file that contains metadata about the contracts public variables and methods. The ABI allows you to access contract methods and variables by their names, instead of having to calculate memory offsets and encoding parameters yourself.
3. Writing Smart Contracts
A good way to get started writing smart contracts is by using the Remix IDE at https://remix.ethereum.org/. Remix has a code editor, compiler, and an interface for deploying and interacting with your smart contracts built-in. Remix stores your code files in the browser in IndexedDB, which means you can close the page and come back later and your files will still be there.
Get started by creating a new file in the contracts folder in the sidebar:

You can call it anything you want, as long as it has a .sol extension. The new file will open in the
code editor. That's where we'll write the TicTacToe smart contract.
The first lines are simple:
//SPDX-License-Identifier: CC-0
pragma solidity ^0.8.13;
contract TicTacToe {
The first thing we'll define inside the contract is a struct that holds all the information associated with a game:
struct Game {
    uint32 board;
    address crosses;
    address circles;
}
Structs in Solidity are simply regions of contiguous memory, similar to C/C++. In this example we'll encode the state
of a TicTacToe board in a uint32 . Additionally, we store the addresses of both players. An
address is a 20-byte number. The total size of this struct is 20 + 20 + 32 = 72 bytes.
A short explanation of the encoding: A TicTacToe board has 9 fields. Each field has one of three states: cross, circle, or empty. We use 2 bits for each field, with 00 meaning empty, 01 meaning cross, and 10 meaning circle. That's a total of 18 bits, which we store in the lower 18 bits of auint32. We encode the fields from left-to-right and top-to-bottom. The top-left field is stored in the lowest 2 bits, then the top-center field, and so on. Therefore, we can get the value of the field at indexileft-shifting the uint32 byi*2and looking at the lowest 2 bits of the result.
Next we'll define events:
event GameCreated(uint64 id, address indexed crosses, address indexed circles);
event GameState(uint64 indexed id, uint32 board);
Events can be emitted by smart contract methods and allow apps to react when certain things happen. Events have a
name and a list of parameters. Apps can subscribe to events by using their name. The keyword indexed
means that a parameter can be used to filter incoming events. For example, an app can listen to
GameState events for a specific id , because the id parameter is indexed. The
board parameter isn't indexed, so it can't be used for filtering. We'll use this later in the example
to listen for GameState events only for the game that's currently being played.
Next we'll define the only state variable of our contract:
mapping(uint64 => Game) public games;As you can probably guess, this maps a game id to an instance of the Game struct. That means that all
games are stored inside one smart contract. It would also be possible to store only a single game inside the
contract, and create a new instance for every new game. The reason we do it this way is because creating contracts
is expensive, much more expensive than changing a state variable inside an existing contract. We'll talk more about
costs later.
Now it's time to write our contract methods:
function create_game(uint64 id, address circles) public {
    require(circles != address(0), "You can not create a new game using the empty address as the opponent address");
    require(games[id].circles == address(0), "You can not create a game with this game id because it is already taken");
    require(games[id].crosses == address(0), "You can not create a game with this game id because it is already taken");
    require(games[id].board == 0, "You can not create a game with this game id because it is already taken");
    games[id].crosses = msg.sender;
    games[id].circles = circles;
    emit GameCreated(id, msg.sender, circles);
}
The create_game method creates a new game with an id and an address for the player playing
with circles. There's no address for the player playing with crosses, because that's always the person that called
this method (i.e. msg.sender ).
The first four lines of the method are assertions that run before we actually create the game. The
require method takes a boolean value, and if it is false, the rest of the method will not be executed,
and the network will return the error message that was passed to require .
First, we check that the circles address is not 0, since that's not an address that anyone actually uses, and if we get 0 as an argument, it's most likely because someone made a mistake when calling our contract.
After that, we check that the game id we got does not already exist in the mapping. The thing about mappings in
Solidity is you can't check for membership directly. Every possible key in the mapping implicitly exists with a
value of 0, until you change it. So instead of something like games.contains(id) , we have to get the
value of games[id] and make sure that it is 0.
If all assertions pass, we can actually create the game, by saving the crosses and circles address to the mapping. We don't save a new value for the game board, because we define an empty board as 0, so we only need to change it when a player actually makes a move.
Lastly, we emit the GameCreated event with the new game id and the addresses used. Because the two
addresses are indexed, an app could listen for new games created with a specific address (although we're not going
to do that in this example).
Next we need methods to add crosses and circles to the board:
function add_cross(uint64 id, uint8 position) public {
    require(position >= 0, "You can not add a cross at a position < 0, valid positions are between 0 and 8");
    require(position < 9, "You can not add a cross at a position > 8, valid positions are between 0 and 8");
    require(games[id].crosses == msg.sender, "You can not add a cross because your address is not the designated crosses address for this game");

    uint32 board = games[id].board;
    require(value_at(board, position) == 0, "You can not add a cross at this position because it is already taken");
    require(turn(board) == 1, "You can not add a cross because it is not your turn, or the game is already over");

    board = set_value_at(board, position, 1);
    games[id].board = board;
    emit GameState(id, board);
}
Again, we start with certain assertions, then change the value of the board, write the new value into the mapping,
and finally emit an event. What's notable here is that we're calling other methods defined in our contract:
value_at , turn and set_value_at . These are called internal calls because
the methods we're calling are also inside our contract. Here's what the value_at method looks like:
function value_at(uint32 board, uint8 index) private pure returns(uint8) {
return uint8((board >> (index * 2)) & 3);
}
The method gets the symbol at a given position on our board as described above. The keyword private
means that this method can only be called from inside the contract, and pure means that it does not
read nor modify the smart contract state. Adding the pure keyword allows the computers running our
contract to better optimize calls to this method.
The other two private methods have a similar declaration. set_value_at is also declared as pure because
it only returns a modified board, but doesn't write it to the smart contract state. turn is a pure
function that decides wether the game is over, and if it isn't, who's turn it is. You can find the whole source code on
github if you're interested :D
4. Deploying Smart Contracts
To deploy a contract (i.e. create an instance), you need to interact with a network. The OG network for smart contracts is Ethereum. The thing about Ethereum is: It's really expensive. Deploying this simple TicTacToe contract to Ethereum would cost around 98 Euros, or 107 USD. Fortunately, there are a bunch of alternative networks that implement the Ethereum specification, meaning that contracts written for Ethereum can run on those networks, but at a much lower cost. Here's an incomplete list of examples, with the amount it would cost to deploy our contract there:
- Avalanche: 6 Euros or 6.5 USD
- Binance: 2.74 Euros or 2.98 USD
- Fantom: 0.4 Euros or 0.44 USD
All of those networks also have a testnet, which works like the real thing, except that testnet tokens have no real value and you can get them for free. For this example, we'll use the Fantom testnet. You can read here how to setup the Fantom testnet, and you can get free testnet tokens from here.
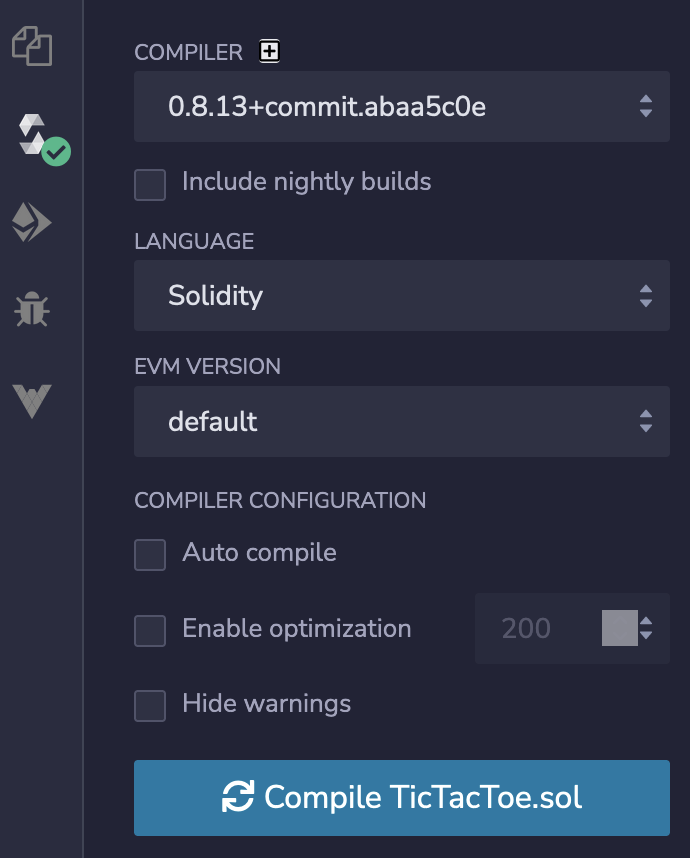
In Remix, select the Solidity tab in the sidebar (the one with the big "S"). Choose the correct compiler version and click compile.
Next, select the deploy tab (right below). Select "Injected Web3" as the environment. That will use the browser extension you've set up with the Fantom Testnet before.

Then click "Deploy". That should pop open a window asking you to confirm the transaction. Make sure you're still on the testnet, and approve the transaction. After a few seconds you should get a confirmation that the contract has been deployed. In the sidebar, under "Deployed contracts", you'll find an entry representing the contract instance you just created. When you open it, you'll see an entry for each public method and attribute of the contract. You can use those entries to interact with the contract directly. For example, type "0" in the field next to "games" and click on "games".
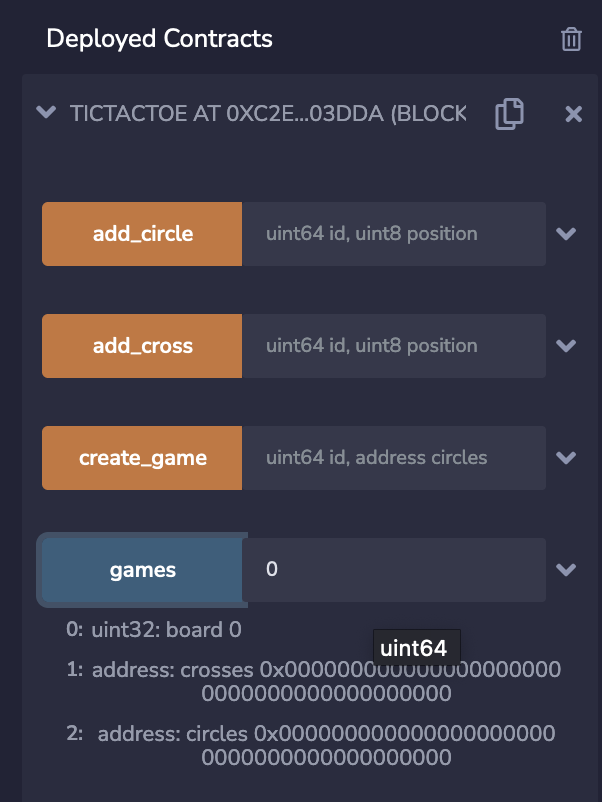
This will retrieve the value from the games mapping at index 0. Because we haven't created a game with
id 0 yet, we'll get the default value back. Note that this is a read-only interaction, which has no cost and doesn't
need approval. If you called one of the methods above, you'd have to pay a gas fee, and need to approve the
transaction in your browser extension.
5. Interacting with Smart Contracts
Typically you write an app with a graphical interface that lets users interact with your smart contract. You can use any conventional programming language for that, but it's most common to create a web app and naturally you'd use JavaScript. The web3js library lets you interface with smart contracts on Ethereum-compatible networks. For our simple example, we'll load it directly from a CDN, along with the bignumber library:
<script src="https://cdn.jsdelivr.net/npm/bootstrap@5.1.3/dist/js/bootstrap.bundle.min.js"
    integrity="sha384-ka7Sk0Gln4gmtz2MlQnikT1wXgYsOg+OMhuP+IlRH9sENBO0LRn5q+8nbTov4+1p"
    crossorigin="anonymous"></script>
<script src="https://cdn.jsdelivr.net/npm/bignumber.js@9.0.2/bignumber.js"
    integrity="sha256-wVL1BH6h7i/pod41XKpG/h1lPY7y6h2iR5INy5ikXvs=" crossorigin="anonymous"></script>
In our JavaScript code, we'll start by defining the contract ABI and address
const contractAbi = [ /* ... */ ];
const contractAddress = "0xC2e56C6a57f02479138716fd9ab8c1cB6cB03DdA";
Replace the address with the value you got from the Remix IDE when you deployed the contract.
Next we'll use the Web3 library to access the contract. I've created a wrapper class for that, but you could also use plain functions if that's more your thing.
class TicTacToeContractWrapper {
    #web3;
    #contract;
    #gameId;
    constructor() {
        this.#web3 = new Web3(Web3.givenProvider);
        this.#contract = new this.#web3.eth.Contract(contractAbi, contractAddress);
    }
The wrapper class exposes a method for creating a new game:
createNewGame(circlesAddress) {
    this.#gameId = this.#generateRandomUInt64();
    const call = this.#contract.methods.create_game(this.#gameId, circlesAddress);
    return this.#getAccount()
        .then(account => call.send({ from: account }))
        .then(receipt => ({ ...receipt, gameId: this.#gameId }));
}
The line this.#contracts.method.create_game() creates a call object, and call.send()
actually sends it to the network. When call.send() is called, the user's browser extension will ask
them to approve the transaction.
We use a similar method to expose the add_circle and add_cross methods of our contract.
Again, you can find the whole source code
on github.
We also need a method to load existing games:
loadGame(id) {
    this.#gameId = new BigNumber(id);
    // listen for GameState events
    this.#contract.events.GameState({
        filter: {
            gameId: this.#gameId,
            fromBlock: 'latest',
        }
    }, (error, event) => {
        const { board, circles, crosses } = event.returnValues;
        const { transactionHash } = event;
        this.#invokeGameStateListeners({ board, circles, crosses, transactionHash });
    });
    // Load the current game state
    return this.#getAccount()
        .then(account => this.#contract.methods.games(this.#gameId).call({ from: account }))
        .then(game => {
            const { board, circles, crosses } = game;
            this.#invokeGameStateListeners({ board, circles, crosses });
            return { ...game, account: this.#account };
        });
}
This method sets up an even listener, using the GameState event we defined in our contract earlier.
Every time that event occurs while our web app is loaded, the callback will be invoked. After setting up the event
listener, we load the game from the contracts games attribute. Note that we use .call()
instead of .send() here, because this is read-only call. Read-only calls don't consume gas and don't
need approval from the user.
I'll spare you the rest of the web app source code here. Tl;dr there's a web component for the Tic-Tac-Toe board itself, another one for the transaction log below the board which shows the most recent events from the event listener, and a handful of callbacks to connect everything together. You can use the app here: https://jfhr.de/tictactoe (remember to switch to the Fantom Testnet!)
6. This is just the start
This post was only an introduction on developing smart contracts. Real world smart contracts are a lot more complex, and can be used for things like fungible or non-fungible tokens, decentralized exchanges, more complex games and so on. If you're interested, I'd really recommend reading the Ethereum documentation, or reading some real-world smart contract code. have fun :D